As the saying goes, "With great power comes great responsibility". This is especially true in the case of the UHK.
You are given the great power of reconfiguring this keyboard in all kinds of wonderful ways, but you can also abuse this power. Imagine binding every key to the letter "A" and setting it as your default keymap. As you might imagine, you end up with a keyboard that is practically useless. Time to meet the factory reset switch!
[fusion_builder_container hundred_percent="yes" overflow="visible"][fusion_builder_row][fusion_builder_column type="1_1" background_position="left top" background_color="" border_size="" border_color="" border_style="solid" spacing="yes" background_image="" background_repeat="no-repeat" padding="" margin_top="0px" margin_bottom="0px" class="" id="" animation_type="" animation_speed="0.3" animation_direction="left" hide_on_mobile="no" center_content="no" min_height="none"]
[/fusion_builder_column][fusion_builder_column type="1_1" background_position="left top" background_color="" border_size="" border_color="" border_style="solid" spacing="yes" background_image="" background_repeat="no-repeat" padding="" margin_top="0px" margin_bottom="0px" class="" id="" animation_type="" animation_speed="0.3" animation_direction="left" hide_on_mobile="no" center_content="no" min_height="none"]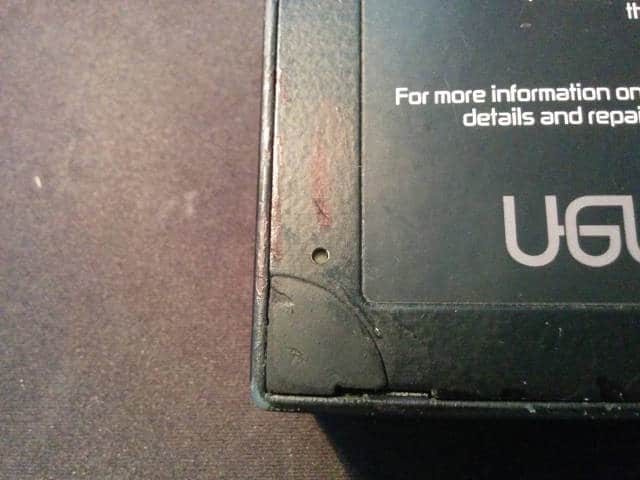
[/fusion_builder_column][fusion_builder_column type="1_1" background_position="left top" background_color="" border_size="" border_color="" border_style="solid" spacing="yes" background_image="" background_repeat="no-repeat" padding="" margin_top="0px" margin_bottom="0px" class="" id="" animation_type="" animation_speed="0.3" animation_direction="left" hide_on_mobile="no" center_content="no" min_height="none"]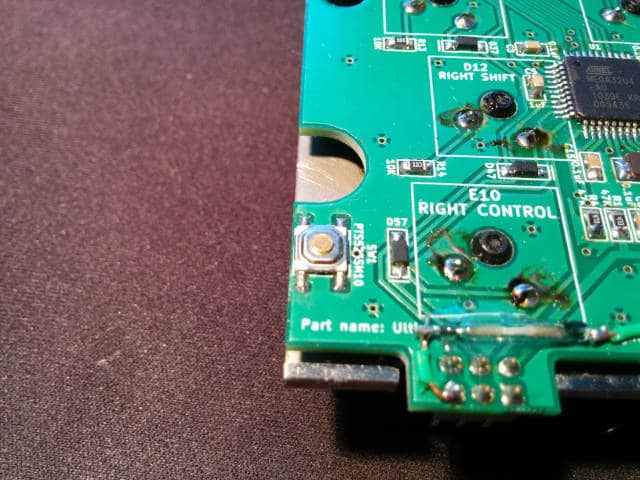
Upon pressing it, the keyboard loads the factory keymap that is stored in the flash, ignoring the default keymap that is stored in the EEPROM, leaving you no way to make your keyboard useless.
I think this is one of the small touches that can make or break a product in some situations.
[/fusion_builder_column][/fusion_builder_row][/fusion_builder_container]
In this blog, I usually talk about topics like the firmware, electronics, product design, and all that kind of jazz but not many words have been said about the mechanical side of things. To give you a glimpse into this world, let me show you some pictures of András, mechanical engineer extraordinaire assembling our latest prototypes.
Not many people would think that 3D printed objects can be extremely malleable but pretty often this is exactly the case. We used to use Objet polyjets to print the case as opposed to our more recent SLS case. As it turns out, if you leave an object made of such a photopolymer resting in an unfavorable position it changes its shape significantly according to the forces that act upon it. We weren't particularly mindful about this problem so András had to put weights onto the the case to make it even.
But it's not enough in itself. The weighted down case must be heat gunned so that it'll "remember" its current shape.
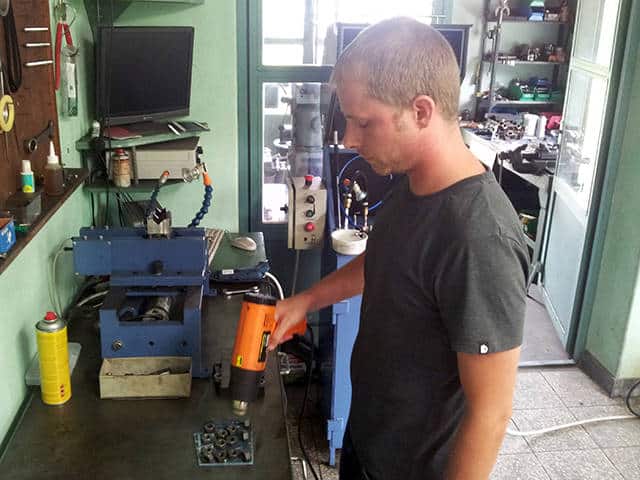
Making the metal guides that hold the two keyboard halves together is also more difficult than one might think, especially for one-off prototypes. First up, András had to grind the steel pin so that it could be shoved into the sleeve.
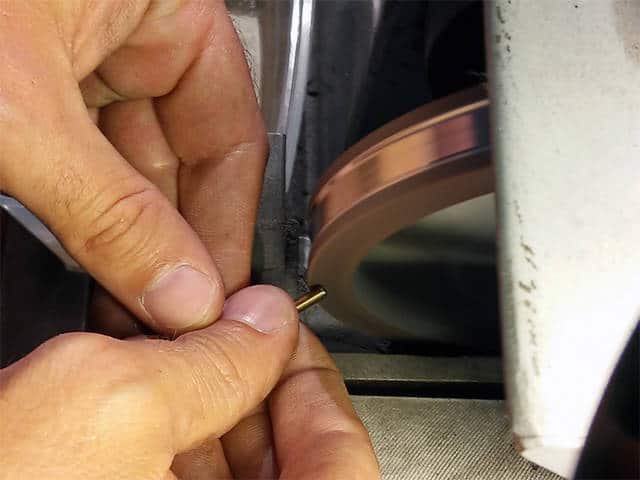
And then, it had to be oriented before fitting it into the hole.
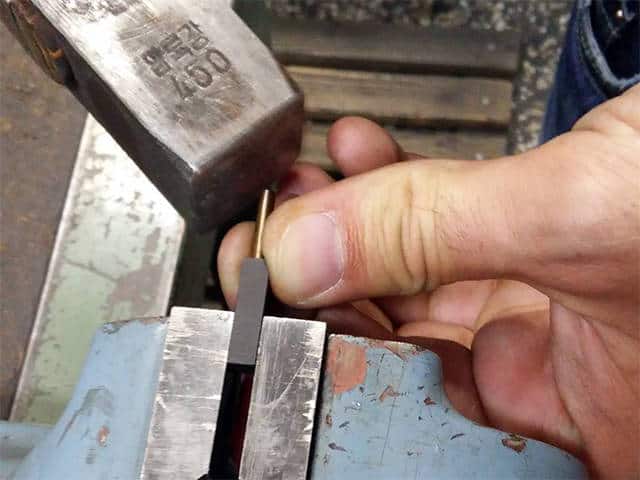
Next up, the pin was interference-fitted into into the sleeve for the shaft to be securely held.

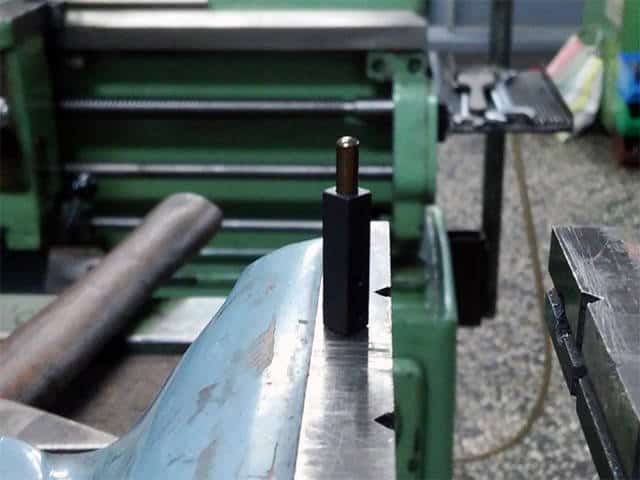
All these steps resulted in the male part of the guide.
After finishing with the above and taking care of many more problems we ended up with the inner assembly.

Looks like a shining armor of a noble knight, worths all the sweat in the world!
Up until this point I was the only one testing the UHK and using it as my daily driver which makes me feel all warm and fuzzy but also somewhat worried. As the lead developer of the project I'm hopelessly biased and rather clueless regarding how other folks would use it.
A while ago András and I were attending to Forbes Flow where we managed to show our beloved keyboard to Ádám Somlai-Fischer, cofounder & principal artist of Prezi. Prezi is considered to be the most successful Hungarian startup of all times so let me just say that this is a big deal for us. Thankfully, Ádám found our project quite interesting and generously offered his help. We asked for testers and we ended up getting contacted by them pretty soon.
Today was a truly remarkable day because it hallmarks the delivery of our two, recently built, 5th generation prototypes to the chosen six, namely:
[fusion_builder_container hundred_percent="yes" overflow="visible"][fusion_builder_row][fusion_builder_column type="1_1" background_position="left top" background_color="" border_size="" border_color="" border_style="solid" spacing="yes" background_image="" background_repeat="no-repeat" padding="" margin_top="0px" margin_bottom="0px" class="" id="" animation_type="" animation_speed="0.3" animation_direction="left" hide_on_mobile="no" center_content="no" min_height="none"]
[/fusion_builder_column][fusion_builder_column type="1_1" background_position="left top" background_color="" border_size="" border_color="" border_style="solid" spacing="yes" background_image="" background_repeat="no-repeat" padding="" margin_top="0px" margin_bottom="0px" class="" id="" animation_type="" animation_speed="0.3" animation_direction="left" hide_on_mobile="no" center_content="no" min_height="none"]
[/fusion_builder_column][fusion_builder_column type="1_1" background_position="left top" background_color="" border_size="" border_color="" border_style="solid" spacing="yes" background_image="" background_repeat="no-repeat" padding="" margin_top="0px" margin_bottom="0px" class="" id="" animation_type="" animation_speed="0.3" animation_direction="left" hide_on_mobile="no" center_content="no" min_height="none"]
Apparently, we forgot to take pictures of Dávid and Vilmos so shame on us! Also, Kálmán couldn't make it but we hope that we'll be able to meet him in person eventually.
Thank you very much Prezi, Ádám, and the chosen six for your help! We already learned a ton of stuff from you guys and this is only getting better as you start to use the prototypes during your daily work. Fear not, we're here to hold your hands!
Last but not least, special thanks go to Ákos Tolnai, our strategic consultant from Ability Matrix. He was with us all the time at Prezi HQ providing invaluable insights that are critical to onboard future users as gracefully as possible.[/fusion_builder_column][/fusion_builder_row][/fusion_builder_container]
We at Ultimate Gadget Laboratories are unusually repair-conscious, especially compared to our throw-away culture. Most consumers are used to throw away gadgets when they break without second thinking. It's not only the fault of people because they're conditioned this way. Such an event of product failure is seen by the vast majority of corporations as the golden opportunity to extract even more money out of us, not only at expense of our pockets but the expense of our environment. But it doesn't stop here. Nowadays, companies are proactively trying to disable customers in every way possible repair-wise to increase their profits.
iFixit is at the forefront of progressing the state of repair. They provide a platform to publish tear-down guides so that one can repair any device based on these guides. Their manifesto speaks their values cleaner than I ever could and they also recently founded the Digital Right to Repair Coalition to fight for our right to repair.
Recently, I put together a document to let them know about our ways to make the UHK as repairable as possible. Apparently, they liked our concepts so much that they ended up making a post about us in their blog.
[fusion_builder_container hundred_percent="yes" overflow="visible"][fusion_builder_row][fusion_builder_column type="1_1" background_position="left top" background_color="" border_size="" border_color="" border_style="solid" spacing="yes" background_image="" background_repeat="no-repeat" padding="" margin_top="0px" margin_bottom="0px" class="" id="" animation_type="" animation_speed="0.3" animation_direction="left" hide_on_mobile="no" center_content="no" min_height="none"]
Thank you very much for the opportunity and especially for improving the state of repair, iFixit. We salute you![/fusion_builder_column][/fusion_builder_row][/fusion_builder_container]
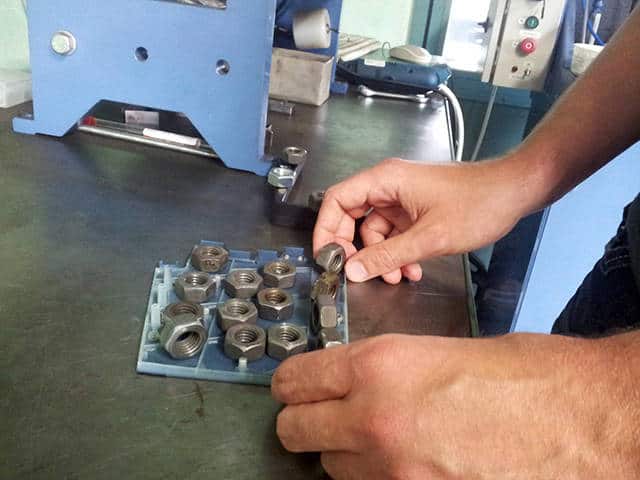
Over the last weekend András and I were having a meeting to test whether our latest and greatest 5th generation prototype really fits together as expected. We've made a couple of improvements to this version, the most significant being the stainless steel inserts. Even though this might not seem like such a big deal to the outsider, in reality András had to make a huge number of changes to the CAD model to make this happen.
As always, a picture says more than a thousand words so let us show you the real deal.


Everything fit together very nicely apart from the 1.5mm thick stainless steel plates which were really 1.3mm thick due to the fault of the company that we entrusted. We're gonna have the steel plates of the correct thickness eventually and we'll assemble some prototypes using those.
It's always fun for me to see people experience our beloved keyboard and realize how it is familiar and yet different in a cool way. Lately, I've been to a Toptal meeting, followed by JSConf 2015 Budapest. In my true style, a prototype was in my backpack waiting to be seen by people. Naturally, some pictures were shot.


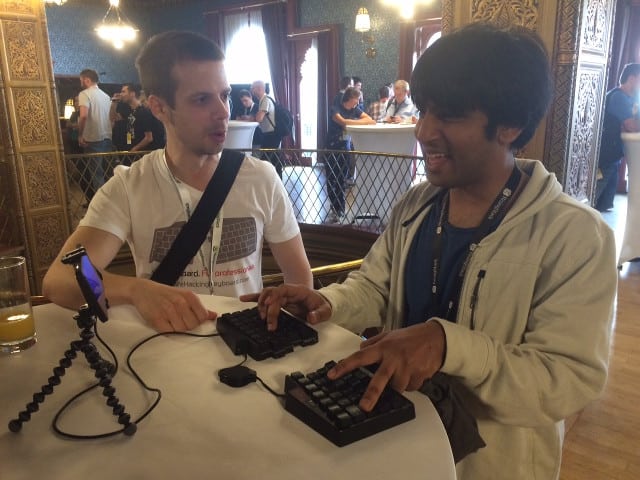
Even more recently, András and I were attending to a meetup at Ustream Hungary and the organizers have asked me to give a talk about the UHK in quite an unexpected fashion. I used our website as a presentation medium and got 5 minutes but the attendees asked so many questions that it ended up being about 20 minutes and people still couldn't get enough after the talk! It was a great experience for everyone involved.
Some of the things I learned along the way:
We're glad to announce that we've just received our 5th generation PCB! Compared to the previous version it's compatible with the ISO layout. Its contour is also a lot more complex to make place for the stainless steel inserts of the back side. Last but not least, the silkscreen became a lot more helpful, clearly showing the values of the various components, making assembly a lot easier.
[fusion_builder_container hundred_percent="yes" overflow="visible"][fusion_builder_row][fusion_builder_column type="1_1" background_position="left top" background_color="" border_size="" border_color="" border_style="solid" spacing="yes" background_image="" background_repeat="no-repeat" padding="" margin_top="0px" margin_bottom="0px" class="" id="" animation_type="" animation_speed="0.3" animation_direction="left" hide_on_mobile="no" center_content="no" min_height="none"]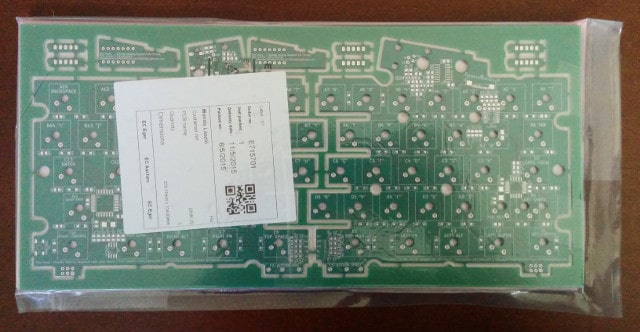
[/fusion_builder_column][fusion_builder_column type="1_1" background_position="left top" background_color="" border_size="" border_color="" border_style="solid" spacing="yes" background_image="" background_repeat="no-repeat" padding="" margin_top="0px" margin_bottom="0px" class="" id="" animation_type="" animation_speed="0.3" animation_direction="left" hide_on_mobile="no" center_content="no" min_height="none"]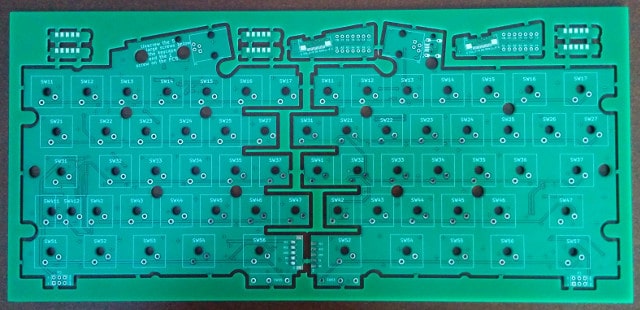
[/fusion_builder_column][fusion_builder_column type="1_1" background_position="left top" background_color="" border_size="" border_color="" border_style="solid" spacing="yes" background_image="" background_repeat="no-repeat" padding="" margin_top="0px" margin_bottom="0px" class="" id="" animation_type="" animation_speed="0.3" animation_direction="left" hide_on_mobile="no" center_content="no" min_height="none"]
[/fusion_builder_column][fusion_builder_column type="1_1" background_position="left top" background_color="" border_size="" border_color="" border_style="solid" spacing="yes" background_image="" background_repeat="no-repeat" padding="" margin_top="0px" margin_bottom="0px" class="" id="" animation_type="" animation_speed="0.3" animation_direction="left" hide_on_mobile="no" center_content="no" min_height="none"]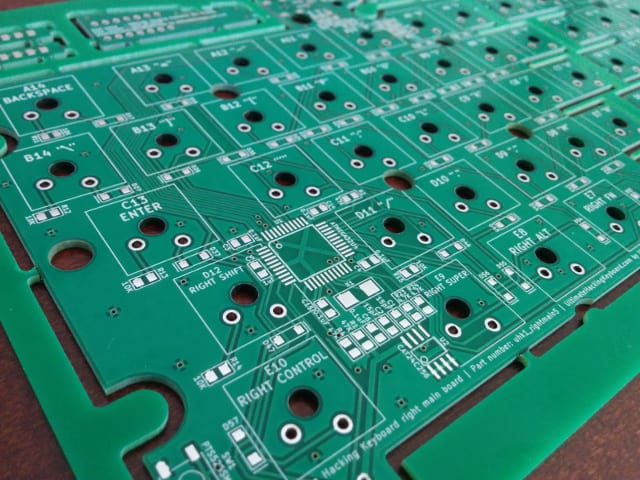
Redesigning the PCB always involves a ton of work and at this point it's more than mature so we don't plan to reiterate any more before the campaign.
Wanna see a bunch of high resolution pictures of the PCB? Head over the Google Plus album![/fusion_builder_column][/fusion_builder_row][/fusion_builder_container]